RoboHelp Gems
What's covered?
This topic is for those small bits of information that do not warrant a topic by themselves but are lifesavers when you need them! I expect most will come from the RoboHelp Forums and the Credit column will tell you who posted it.
This page was previously known as RoboHelp Snippets but then Adobe added a feature to RoboHelp called Snippets, which caused some confusion. Hence the name change.
From time to time I edit this page and remove items that relate to very old versions of RoboHelp that will not be in general use. I do keep them in an archive.
Most Snippets indicate if they are Classic or New UI specific.
|
|
Searching This Page
Click the Expand/Hide icon on the top right of your browser window. That ensures that the content of these dropdowns is included in the search.
Content Creation
|
No |
Date |
Credit |
Gem |
|
35 |
15 Apr 2025 |
David Kinyon |
Want a global CSS across several projects?Want a global CSS across several projects? See this thread with David Kinyon's Correct Answer. |
|
34 |
17 Aug 2024 |
Peter Grainge |
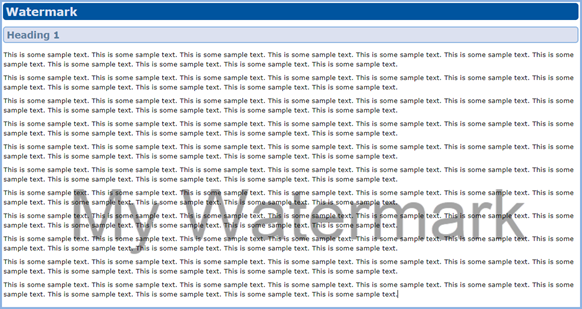
Add a WatermarkAdd a Watermark Create an image for the watermark. In this example I created a PNG in Snagit and gave it a transparent background. I saved that in the same folder as the CSS file. Next I added this to the CSS file. You can style that as required. body { That gave me the watermark below.
The watermark will not appear in a Word output but does appear in PDF outputs. |
|
33 |
09 Jul 2024 |
Adobe |
Glossary Terms in FramelessGlossary Terms in Frameless When you generate a framless output you can choose between the terms being shown as a popup, expanding text or a tooltip. By default popups use a rather large font compared with what most users would set as their normal paragraph style. This cannot be changed in the template but there are two solutions. Both require the following in a CSS file. You need to add this as a minimum. You can also define a different colour, different font and so on. .rh-popover { font-size:8pt; } You can either add that to
Expanding text can be configured in a similar way using this definition. .expanding-content { font-size:8pt; } Tooltips cannot be edited as they use the browser's functionality. |
|
32 |
21 May 2024 |
Adobe |
Blank lines do not appear in outputsBlank lines do not appear in outputs After applying 2022 Update 4 you will find that blank lines created for spacing purposes show in the authoring panel but not in any output. This is because of a change Adobe had to make to fix a PDF problem. The solution for all outputs is to add the following to your CSS. p:empty { The values can be expressed in your preferred unit of measure. Here I have used points to help explain how it works. In the CSS I tested with, the normal <p> style font is 10 points with padding below of 6 points. By adding padding in the CSS of 16 points gives the same depth as a blank line. If you have blank lines within a table, you also need to add the following to your CSS. td:empty { UPDATE - An issue with dropdowns that was previously included here has proved to be unrelated.
|
|
31 |
27 Jul 2022 |
Peter Grainge Amber Boughen LouEllen Heckman |
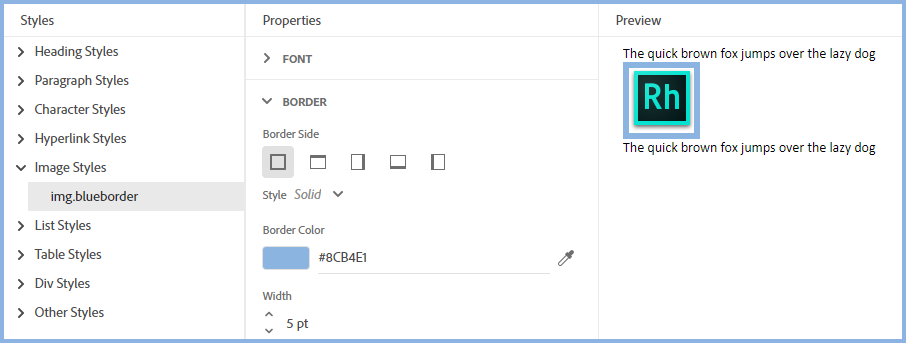
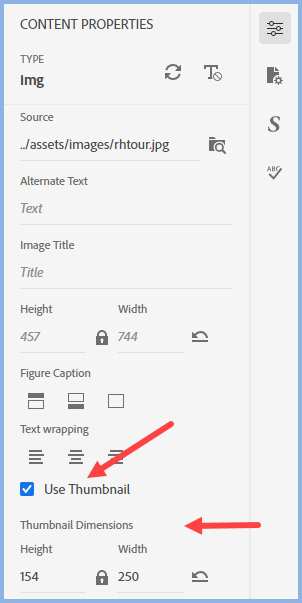
Image borders not showing in thumbnails?Image borders not showing in thumbnails? If an image style is applied to an image to put a border around it, that border will not show in the thumbnails or the expanded image in the output. The easiest solution is to simply apply a border to the image in an image editor such as Snagit. The border will then show in your topic, the thumbnail and the expanded thumbnail. The correct method is more complex but has the advantage that you can easily change the colour later or set different colours for different outputs. This is what you need to do. Create an image style in RoboHelpThis allows you to see the border when creating content. It also lets RoboHelp write the CSS code so that you can paste it into the other definitions you will require. This is a simple blue border created in the CSS editor.
If you now generate an output without selecting the Use Thumbail checkbox, the image will have a blue border as defined above. ThumbnailsIf you want to use thumbnails, you need to click the image in the topic and select the Use Thumbnail checkbox, then set the size of the thumbnail image as shown below. In this example the thumbnail size has been set to roughly one third of the full image.
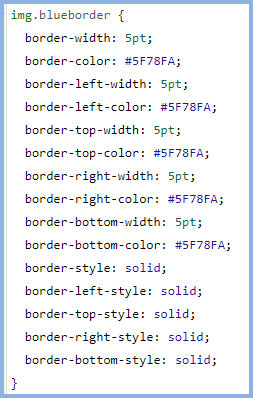
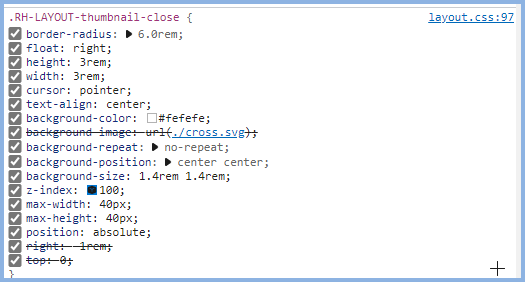
Without any further work, you will both the thumbnail and the expanded image but they will not have any borders. The SolutionYou need to create an additional CSS file that will be added to User Assets in your skin. Depending on your requirements two or three definitions need to be included in this CSS. For the purposes of this example, that CSS will be called thumbnail_border.css. Open a text or CSS editor and create the required definitions, which are: .popup-image-thumbnail .RH-LAYOUT-thumbnail-image .RH-LAYOUT-thumbnail-close (Optional) In the first two you can simply paste in the source code from the img.blueborder style you created in your main CSS or you can define it as required. The .RH-LAYOUT-thumbnail-close definition is only required to reposition the white close icon or define a different button. Save the file in a temporary folder as thumbnail_border.css. The CSS will look something like this.
You can also change the close icon by adding background-image: url('path to and image filename’); Note the button is now within the image rather than outside as above.
|
|
30 |
31 May 2022 |
Peter Grainge |
Add a DIV style to your CSS file. You can add any other styling you want such as a background colour. In the CSS add something like this example, which is specifically to apply just an indent. The class name of the indent can be whatever you want. div.indent { In your topic go to source view and add the div tag immediately before whatever you want it applied to. <div class="indent"> On the line below where the indentation is to stop being applied, add the closing div tag. </div> |
|
29 |
26 Apr 2022 |
Adobe and Peter Grainge |
|
|
28 |
25 Jun 2021 |
Peter Grainge |
How to add a background imageHow to add a background image To add a background image to all your topics add a line to the body tag in your CSS file body { background-image: url("your-image-name.png"); } This assumes the image is in the CSS folder. Otherwise you need the relative path. It works for both online and PDF outputs, I have not tested it in Word. If you only want it in one output, then create a copy your CSS and just use the copy with the tweak for that output. If you add it to the master page for that output that will override the topic CSS and give you your image in just that output. **************************************** To add the image to just one topic such as a PDF cover page, the steps are different. Add this to your CSS div.coverdiv { min-width:100%; height: 2000px; max-height: 100%; background-image: url('your-image-name.png'); } This assumes the image is in the CSS folder. Otherwise you need the relative path. The height shown above is way above what you need but the max-height will stop it splling over. In the cover page add <div class="coverdiv"> after the body tag and before any content and </div> before the closing body tag. |
|
27 |
09 May 2017 |
Willam van Weelden |
Want list numbers bold but text normal?.Want list numbers bold but text normal?. CLASSIC VERSIONS Edit your CSS to include the font-weight attribute as below. li { font-weight: bold; } li p { font-weight: normal; } NEW UI VERSIONS (Added 25 June 2021) This can be done in the CSS editor. |
|
25 Classic Only |
18 Mar 2013 |
Peter Grainge |
Problems with one list following another.Problems with one list following another. CLASSIC VERSIONS If you have say a numbered list item followed by say a bulleted list, you may find the closing tag for the first list appears after the second list.
This is a bug but there is a workaround. Create a paragraph style called Spacer or suchlike. Set the font to be 1pt and no top or bottom margin. After the first list, insert a line using that style, then create the second list. With just 1pt between the lists, the space line will not be noticeable. |
|
23 Classic Only |
09 Feb 2013 |
Peter Grainge |
Creating page breaks.Creating page breaks. CLASSIC VERSIONS RoboHelp 9 introduced the ability to create page breaks that work when topics are printed from the online help and survive the trip to printed documentation. Generally the feature works fine but if the style following the page break is different from the style preceding it, a blank line is inserted in whatever is printed. This alternative method avoids that problem and will work in any version of RoboHelp. Open your CSS file and add this line. .break {page-break-before: always;} The first instance of the word "break" (in red) is the name of this style and can be changed to anything else you prefer but stick to alpha characters and avoid spaces. When you want to insert a page break, go to the beginning of the line that is to be on the next page. Select "break" from the style dropdown. In the design editor you will see the page break symbol on the line above. |
|
21 |
16 May 2012 |
John Daigle, Willam van Weelden and Peter Grainge |
Non-scrolling region.Non-scrolling region. Authors who have produced WinHelp will remember the non-scrolling region, an area at the top of the screen that remained visible as the user scrolled down the topic. From time to time people have asked for a method of achieving the same with WebHelp. The CSS style below will give you what you want and the lines are commented to help you understand what each part does. H1 { With that alone your topic will look fine in Design View but in a browser the first few lines of text will be hidden behind the non-scrolling region. You can add some blank lines to compensate but it's probably easier to add padding-top: 50pt; to the body tag. You will see too much white space at the top of the topic in Design View but it will be OK in the browser. Change the measurements to suit your requirements. Note: This method does not work in CHMs. |
|
18 |
03 Oct 2009 |
Leon Descoteaux. |
When you view topics or web pages, you may see the author has included a Return to Top link at many points in the page. Leon came up with a better solution, one link that is always at the bottom of the page! With slight amendments and some of my comments, this is what he posted. Leon's Post It looks like this:
This is the code to be used within each topic and within your (MyProject).css file: At the top of each topic (I have it just under the H1 heading) <p class="top"><a class="topic" title="Return to Top" href="#">↑ Top</a></p> In your .css style sheet file (place the p.top after the default p & LI.p settings, and the A.topic's after the default A settings) p.top { PG: I did not include the link definitions in my CSS and it worked fine. That may have been because I already had appropriate definitions. See what works for you. A.topic:link, Simply customize my settings to suit your organization's style and formatting needs (fonts, location, padding, border, etc.). |
|
16 |
25 Sep 2005 |
New topic. |
Entering symbols / unicode characters.Entering symbols / unicode characters. Sometimes you want to enter characters such as © or something more obscure such as ¶ or ∑ that are not in RoboHelp's symbols. Here's the easy way that accesses all the characters available on your PC, including unicode, provided you have some unicode fonts! Look for Arial Unicode MS. In Windows, go to Start | Run and type in charmap. Locate what you want, click Select and click Copy, then paste it in. Select the Advanced view and then Group By "Unicode SubRange". An additional dialog appears making it easier to find what you need. |
|
14 Classic Only |
19 Oct 2007 |
Sheela Ayyagari |
Sheela worked out this method.
Sheela advises that RoboHelp will prompt to import the spreadsheet and that has to be done if the link is to work. |
|
6 |
01 Jun 2005 |
RH Forum Post |
RoboHelp allows you to add a tooltip over images by filling in the Screen Tip field in the insert images dialog. Perhaps you want to add a tooltip somewhere else, maybe over a paragraph? Hold your mouse over this paragraph. It's as simple as the html below. <P><acronym title="Your tooltip">Your paragraph of text.</acronym></p> Update 28 Mar 2012 - acronym is not supported in HTML 5. Try abbr instead. If you want something more sophisticated, Leon Descoteaux recommended Walter Zorn's really neat solution. |
|
5 |
07 May 2005 |
Leon Descoteaux |
Many authors have experienced problems getting their links to appear as defined in their style sheet. Thanks to Leon Descoteaux for posting this useful snippet. Make sure that the links are arranged in the following order inside your style sheet, including any link classes you might be using, such as plain and fancy: A:link A:visited A.plain:link A.plain:visited A.plain:hover A.fancy:link A.fancy:visited A.fancy:hover Also look for any embedded hyperlink styles. They can get written into topics created when you import a Word document. See Importing Using RoboHelp for more information about this point, even if you are using an earlier version. |
|
3 Classic Only |
02 Mar 2005 |
Peter Grainge |
The Colour Palette.The Colour Palette. CLASSIC VERSIONS Whenever you create a new project, you just get the standard colours when you click Format | Colors. Ever since RoboHelp X5 and above the colours are defined in the file rhcolor.apj. Once you have the colours you want in one project, you can copy that file to other projects. You might want to keep variants like rhcolor01.apj, rhcolor02.apj etc. Just rename the one you want and copy it into a project. You can also edit the file. Open it in a text editor and create a new section. It will be obvious what you need to do. |
|
2 |
06 Nov 2004 |
Rick Stone and Peter Grainge |
CLASSIC VERSIONS
NEW UI VERSIONS
|

Importing from Word
|
No |
Date |
Credit |
Gem |
|
5 Classic Only |
24 Jan 2014 |
fm1476 |
RoboHelp freezes when importing.RoboHelp freezes when importing.
CLASSIC VERSIONS fm1476's first thought was that there was a hidden dialog. However, it proved to be that there were pending changes to the document. Once they were accepted, the document imported without further problems. |
|
2 Classic Only |
01 Dec 2007 |
Peter Grainge |
Images not showing in Project Manager.Images not showing in Project Manager.
CLASSIC VERSIONS Sometimes when you import a topic, RoboHelp reports that the topic, all images and other associated files have been imported but you cannot see the images in Project Manager. A check via Windows Explorer shows they are there but not according to Project Manager. This is easily fixed. In Project Manager, create the folder using the name given in Windows Explorer. Not only will the folder be created, suddenly all the images will appear. If some images are showing and others are missing, try renaming the folder. On changing from Images to Images1 for example, you will likely find all the images suddenly appear. Then you can rename again from Images1 back to Images. This tends to occur more when a folder only has images. |
Generating Outputs
|
No |
Date |
Credit |
Gem |
|
10 |
26 May 2025 |
Amber Boughen |
Need a Context Sensitive Help Tester?Need a Context Sensitive Help Tester? Amber has created a CSH Tester that you can download here. It works with both frameless and responsive outputs but not CHMs. If you need to test a CHM, instead generate a responsive or frameless output and test that. If the map id works there, it will work in a CHM. The file is an HTML page that passes the path that opens your help and the map ID to the Adobe supplied RoboHelpCSH.js file that you will find in your RoboHelp installation. |
|
9 |
10 Mar 2025 |
Stefan Gentz |
Stop Browser CachingStop Browser Caching Add these lines to the head section of your topics. <meta http-equiv="Pragma" content="no-cache" /> |
|
8 |
01 Aug 2022 |
Peter Grainge |
When generating an output, you may see one or more warnings such as the one below. Skipped copying external file "path and filename" It is not a warning to be ignored as it is telling you that a link in one of your topics is pointing to something that will not be in the output. The link is to something on your local drive or a network drive and browsers will not allow access to them for security reasons. Users will get a Page Not Found warning, hence you need to fix the issue. The warning is written as an absolute path but the link is written as a relative path so searching on the reported path will not find the link. It would be more helpful if the report stated the link as written and I have suggeted that to Adobe. Meantime you have to search on the filename but that can give many false reports as you may have lots of links to the target, with only one that is wrong. Search on parts of the path as well. The one thing you can be sure of is that somewhere in your project, there is a bad link and you do need to find it. |
|
7 |
23 Sep 2022 |
Amber and Peter Grainge |
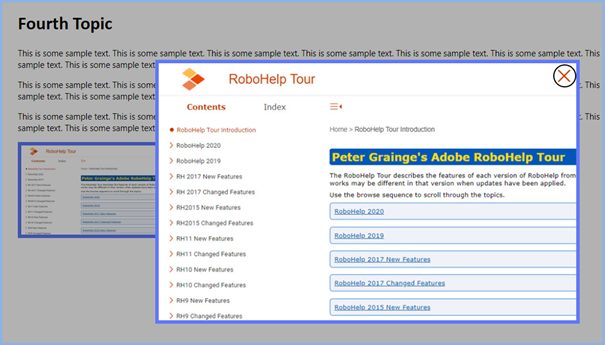
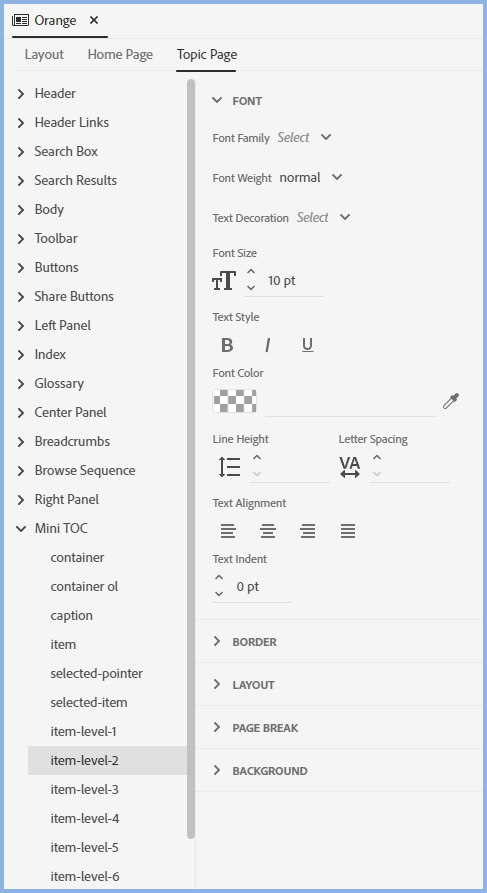
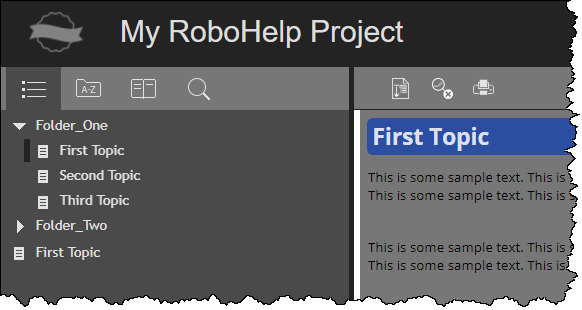
Editing the Minitoc.Editing the Minitoc. By default all the headings shown in the minitoc have the same font for all levels. It helps users if the entries are indented according to the heading level as shown in the topics in the RoboHelp Tour on my site, as shown in this example. In most minitocs the headings shown start at H2. Click on that level in the skin editor to see the configuration options.
In the minitoc on my site the first level shown is item-level-2. That has no indentation. You will see that the next level is indented. That has been achieved by going to Layout > Padding and applying a left margin of 24pt. The colour applied should be set by going to the Font settings and applying the required colour. At the time of writing this though that is not working because of a bug. It will be fixed in a future version so check first. If it still does not work, there is an easy workaround. Create a CSS file as below but with your colours. In the skin editor go to Layout > User Assets and add that CSS file. .RH-LAYOUT-MINITOC-item-level-1 a { color: rgb(0, 84, 159); } Note there is a little catch. In the RoboHelp Tour the minitoc only uses Item Levels 2, 3 and 4. In the CSS file you create the numbering applies to the levels used. Thus Level 2 in the skin editor is Level 1 in the CSS. |
|
6 |
10 Feb 2022 |
Adobe |
This is the information Adobe gave me on this subject. **************************************** Gzipped(.gz) compressed files are used to improve search performance by reducing the download time, hence reducing the overall time for search results. Since compressed files are smaller in size they, load faster. However in order for this to have any effect both browser and web server have to be configured to use them. Most modern browsers are configured to always request compressed files (unless user has disabled it) so there is nothing much to be done by user, but the web server might or might not have enabled them so that must be checked. Whenever a browser makes a request for a compressed file such assearch_db.js, the web server will first look for a file named search_db.js.gz if it is present then it will be served, otherwise the original file search_db.js will be served. The amount of time the browser takes o decompress these files is negligible compared with the time it will take to download an uncompressed file. In the end RoboHelp can only generate these files, which it does for all javascript files, but it has to be hosted and enabled by end users. **************************************** |
|
5 |
17 Jan 2022 |
Adobe |
Guide users how to search.Guide users how to search. By default the Search box shows "Search...". Add some text so that users can get exact matches only.
Open Labels in the Outputs tab and look for Frameless > SearchPlaceHolder and edit the default text. |
|
4 |
30 Sep 2021 |
Adobe |
When you generate help with the Glossary Style set to Expanding Text, there is no obvious way to change the colour of the expanding text. What you need to do is go to the CSS editor and create a Character style "expanding-content and style that as required. |
|
3 |
12 Aug 2021 |
Peter Grainge |
Classic had an checkbox for HTML Maintain Heading Levels. If not checked the TOC looked correct but there was a problem in the body. In a simple TOC with just two levels of books, the second level book would have Heading 2 applied. Assuming the topics within that book started with Heading 1, that would get relegated to Heading 3 and all other headings in the topic would also get relegated. That could make a mess of the body of the document. If checked the topics remained as designed but in the TOC the topic title would be Heading 1 while the book it was within would be Heading 2 or lower. Neither were ideal. In the new UI versions Books have become Sections on the basis that physical books have chapters, there is now one book with many sections. When creating the book TOC in RoboHelp you can still have lower level sections but when you generate onlt the top level section titles will appear in the Word. The topics in lower level sections will become part of the previous top level section. A workaround to consider is to set all top level sections to CAPS and then move the lower level sections to become top level sections but leaving them in mixed case. That will produce a TOC in Word with all the section names. |
|
2 |
04 Jul 2021 |
Adobe |
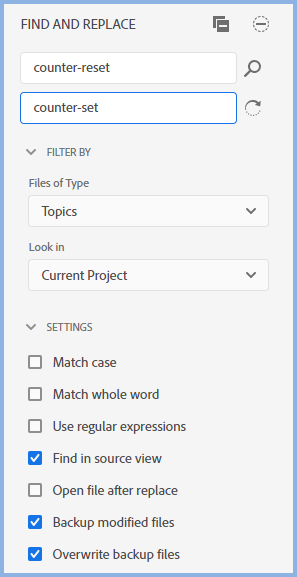
List numbering problems in Firefox.List numbering problems in Firefox. UPDATE This issue was fixed in Update 6. Apply any later update and you should not see this problem. If you apply Restart Numbering in a list you will see incorrect numbering in Firefox. This follows a change in how Mozilla interpret the counter-reset property. The problem is more likely to be seen where Auto Numbering is applied to a paragraph or heading style but it does also affect ordered (numbered) lists. Previously if you applied Restart Numbering, every subsequent item in the list would also change. Following the change in how Mozilla interprets the counter-reset property it will only affect the list item to which it has been applied. Edge and Chrome continue to support the generally accepted interpretation. Fortunately there is a solution. Use RoboHelp's Find and Replace to search for "counter-reset" and replace it with "counter-set".
You will need to select Find in Source View. The backup settings are up to you. Personally I would create a backup of the whole project and then deselect those options to avoid having to remove the backup files later.
|
|
1 |
01 Jul 2021 |
Peter Grainge |
Generation fails.Generation fails. Generation can fail for various reasons so this is a general guide as to what to do. View the LogRight click the preset and select View Log. That should tell you where the problem is. A common warning is Skipped Copying External File. Somewhere in your topics there is a link to a topic that is not in the project. Often that will be because someone has created a link to a topic in another project by mistake or to an output file instead of the source file. Create a small TOCCreate a TOC with just one very simple topic and generate using that. If that works it suggests the problem is one of your topics. See the next item. Divide and ConquerCreate two copies of the TOC used for the failing preset. Delete different halves of the content and generate using those TOCs. If one works and the other fails, you know where the problem is. Keeping repeating the process until you narrow it down to the offending topic(s). |


|
No |
Date |
Credit |
Gem |
|
5 |
20 Dec 2018 |
Adobe |
|
|
4 Classic Only |
15 May 2009 |
Steph Van de Velde |
Copy topic title and URL to the clipboard.Copy topic title and URL to the clipboard. CLASSIC VERSIONS Snippet 3 in this section enables you to add a text link or graphic to a topic that will generate an email with a link to the topic. The script relies on the text link or graphic being in the topic but Steph wanted a toolbar button. He has kindly shared this script. It does not create an email but it does copy the topic title and URL to the clipboard. Note that not all browsers allow JavaScript to copy data to the clipboard. This method will not work in Chrome and possibly not in Firefox. You create a new toolbar button in the skin editor using the JavaScript action. Select the Inline JavaScript option and click the Edit icon. The function script is below. function CopyURL() The above script will not work if you are using the Dynamic User-Centric Content (Content Categories) feature introduced in RoboHelp 9. |
|
3 Classic Only |
25 Sep 2005 |
Roger Nilsson, Sean McGurr and Willam van Weelden |
|
|
1 |
20 Jun 2004 |
Sheila Connelly |
To create an email with the To, cc, bcc, subject and body completed, paste the text below into the True Code view. <p><a href=" Delete any line you don't want. For example if you do not want the body pre-completed, delete the line &body=Type your message here. I have added line breaks to make it easier to understand the content. After pasting the html into RH and deleting any unwanted lines, place the cursor at the end of each line and press the delete key once. The only spaces should be the one between "a" and "href" at the beginning and any that appear in the subject or body fields. |
Navigation Pane
|
No |
Date |
Credit |
Gem |
|
6 Classic Only |
23 Nov 2011 |
Peter Grainge |
Change the search and index prompts.Change the search and index prompts. CLASSIC VERSIONS Phrase searches need to be enclosed in quotes but does the end user know that? Probably not so help them with a prompt.
To change the string from the default go to File > Project Settings > General Tab > Advanced > LNG File Tab and change FtsInputPrompt to your own string. You can also change the Index prompt and many other terms used in the output. |
|
4 |
03 Feb 2007 |
Peter Grainge |
Want the TOC above the topic?Want the TOC above the topic? CLASSIC VERSIONS One poster wanted what they described as "a vertical layout in WebHelp similar to that offered in the vertical skins for FlashHelp". This means the TOC appears above the content. They found the solution below. "I have found that the skn file in !SkinSubFolder! for the project contains two instances of frameset cols = "220,*": changing these to frameset rows = "220,*" seems to achieve the desired effect, and I have not yet found any glitches with the output (at least with IE6 as browser). NEW UI Try the supplied Studio skin. |
|
3 Classic Only |
03 Feb 2007 |
Philip Tory |
Missing Index Tab.Missing Index Tab. CLASSIC VERSIONS Philip was working on a RoboHelp project and generating a CHM output, only problem was the index tab was missing! After a lot of poking around Philip found the solution. All his keywords were in the topics. By telling RoboHelp to create future keywords in the HHK index file, adding a single index word and then switching the setting back to store keywords in topics, the problem went away. It seems you need at least one keyword in the HHK index file. |
|
2 |
14 Aug 2004 |
Rick Stone and William Huscher |
Toolbar and Navigation Pane Fonts.Toolbar and Navigation Pane Fonts. CLASSIC VERSIONS The font for the toolbar and the navigation pane in WebHelp can be changed by using the skin editor. Changing the font for the navigation pane changes it for the TOC, the Index, the Search and the Glossary tabs. If you want a bit more control then you need to edit some files in the generated or published output, whichever you use: TOC = edit the font setting in whtdhtml.htm - this affects the items listed in your toc. Index = edit the font setting in whiform.htm - this affects the text at the top of the pane Type in the keyword to find: It does not affect the entries displayed. They remain controlled by the skin setting. Search = edit the font setting in whfform.htm - this affects the text at the top of the pane Type in the word(s) to search for: It does not affect the entries displayed. They remain controlled by the skin setting. Glossary = edit the font setting in whgdhtml.htm - this affects the text at the top of the pane and the top of the results panel Term: It does not affect the entries displayed. They remain controlled by the skin setting. NEW UI Use the skin editor. |

Printed Documentation
|
No |
Date |
Credit |
Gem |
|
6 |
14 Jun 2025 |
Adobe |
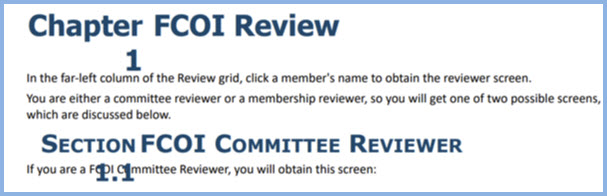
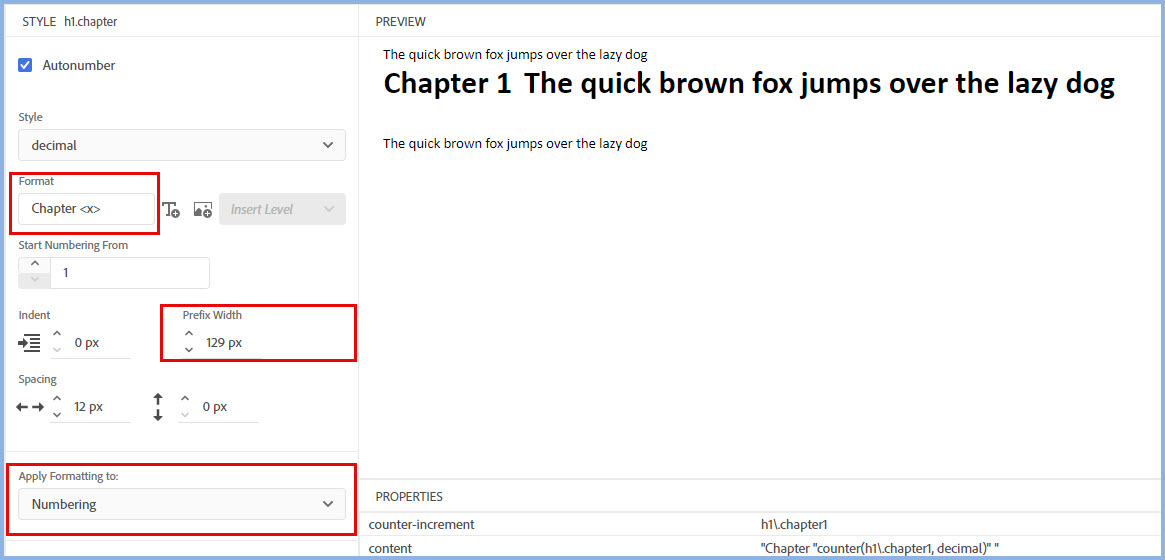
Numbering Wrapping / Not WantedNumbering Wrapping / Not Wanted In this thread, LonTheWriter did not want numbering in his PDF output but the screenshot shows it was wrapping to a second line, which would not have been good had he wanted numbering.
To fix either or both issues. open the template used in your PDF/Word template, go to the Stylesheets and open content.css Make sure the Show Full Selector option is selected. The styles that need editing are the ones showing as h1,chapter, h2.chapter and so on.
If you do not want the numbering, simply deselect Autonumber for those styles. If the numbering is wrapping as shown in the first image, select Numbering as shown below and then increase the Prefix Width until it no longer wraps. Allow a bit more width if double digit numbers will be reached. The text "Section" and "Chapter" can be edited in the Format field below or you can remove it so that you just have the numbering.
|
|
5 |
29 May 2024 |
Adobe |
Glossary terms not linked in PDF outputGlossary terms not linked in PDF output If you can't get the glossary terms in a topic to link to the glossary, see the steps posted in this forum thread. |
|
4 |
22 May 2024 |
Peter Grainge |
Bullet style incorrectBullet style incorrect For example, in RoboHelp you have created a style with a square bullet but in Word it shows as a round bullet. This has been reported to Adobe. See RH-12394 | Tracker (adobe.com). Nonetheless, certain settings will map the style pending the bug being fixed. The following will help you understand how to make the correct style come through in Word. **************************************** WITHOUT A WORD TEMPLATE
WITH A WORD TEMPLATE The above workrounds do not work with a Word template in the preset. The square bullet in the Word template was not applied in the output. This is the second part of the bug. |
|
3 |
17 May 2023 |
Adobe |
RoboHelp 2022 introduced templates to replace Master Pages. For online outputs there is no change in how they function but for printed outputs the changes are significant and differ between PDF and Word outputs. It is explained in the RoboHelp Tour. This allows for advanced users to go way beyond what can feasibly be documented and that is what one forum user needed. Fortunately Adobe came to the rescue with a solution. See this response in the RoboHelp forum. I have added a downloadable RoboHelp 2022.2 project. It demonstrates the method and has full instructions. Click here. |
|
2 |
31 Jul 2005 |
Peter Grainge |
Is Printed Media Outdated.Is Printed Media Outdated. It was suggested in a RoboHelp forum posting that printed documentation is outdated and that only online help is required. Here's my response. **************************************** The correct media depends partly on the content and partly on the users. Has anyone asked your users rather than being prescriptive? On content, if all the topics are short and easily digested, then online help only can be considered. If they are longer topics, and particularly if the content is complex, then it can be difficult to digest properly on screen. You can argue that any topic can be printed but sometimes you have users who want to improve their product knowledge and that is more easily done by scanning a printed manual and homing in on relevant stuff. On users, there will always be people who prefer to work from the printed media. For a start they can annotate it. Don't make the mistake that these are older people. I find many younger people prefer this media, again with complex subject matter. Nonetheless, you could avoid the cost of sending the document to a print-house. What we do is PDF it and ship the PDF as well as the online help. For users who want the online help, they still have it. For users and situations where printed media is preferred, they can print the PDF version in its entirety or in part. You avoid the cost but the customer can still have their printed version. I think the key is to let the user decide. Horses for courses. |

Source Control
|
No |
Date |
Credit |
Gem |
|
2 |
11 Jun 2011 |
Author Care, Gravenstein & Amebr |
Multiple authors - when to use source control.Multiple authors - when to use source control. I don't normally cover source control as it is something I have studiously avoided and with no ill effects, indeed, quite the reverse. This snippet is an exception as La Kisha asked about the best way forward as she was going to be joined by another author. The responses were particularly helpful and I felt it worth recording the key points here. In addition to the information below, Amber Boughen posted in this thread on 7th September 2021 with some useful information. La Kisha postedI've been the sole writer at our company for 6+ years. I finally have someone to help me; however, this has introduced a new challenge. We will both be working on the same RH project, and we will be using VSS for source control. I'm not sure how we should be 'sharing' this single RH project. Does anyone have any best practices for when working in this type of situation? I have questions such as:
Author Care respondedI recently faced a similar situation (we use TFS here incidently). What I did was to split the main help project into a merged help system with a master project and sub projects and then enforced a strict rule that only one author may checkout one project at a time. Our TFS revision control software was configured to forbid multiple checkouts of the same material. Whilst you can both work on different topics in the same help project simultaneously in my opinion this is a messy way to author. The golden rule here is to keep things simple and robust and don't be swayed by non authors in your course of action. Then Gravenstein added this great postI like Author Care's golden rule: keep things simple and robust. This topic touches on the three basic ways of sharing help authoring tasks. In order of complexity:
Here are some tips and observations, based on my experience with RoboSource Control, in no particular order:
Followed by another from her dealing with the specific questionsIf one author is creating index keywords, when another has files checked out...I think it depends on how you have your indexing set up, whether the entries go into the topics or into a single file. (Feel free to jump in on this anyone.) If what he is doing requires a change to a topic that he can't check out, then I don't think he can complete the action. You could test this and see whether it's a problem or not. If someone is doing a large-scale action, it might be better for the other authors to stay out of the project while it's going on. When someone creates new snippts or variables, is it best to check them in immediately...I would think that sooner would be better than later, but that'll be up to you and your team to decide. Be sure to keep each other informed about what your doing in your shared project. How do we manage both of us working on the same project...what should our workflow be? When you open the project, get the latest version of the files. If you are working in unrelated areas of the project (recommended), you process will be more or less the same as in a non-source controlled project. Check in topics, especially any common files, as soon as you're done with them. If you need to make any large-scale changes to the project, discuss them in advance with the other writers, and arrange to do so while they are not in the project. Truly, you and your team need to decide what your workflow is. Will you specialize, or will you decide that everyone does everything? For example, for consistency, you could decide that one person is in charge of laying out the structure of the project and creating each new topic, while the other person focused on technical content. Will you work only in folders A-F, while your neighbour works in G-M? Who will be the source control administrator? Finally Amebr added thisIf both of you will be working on the same project every day, I highly recommend getting into the habit of deleting the cpd first thing each day. (I find doing it first thing every day means I don't forget on the one occasion when it's actually necessary. ) I tend to do a Get as well to ensure I have all the latest files. This will show up any issues if people have been moving files around (broken links, missing topics, etc). RH 8 I think brought in a checkbox that deletes the CPD automatically on close. However, if your project is one that takes 20min or more to re-build then this won't be practical. In this case, communication is key. Tell each other when you are about to rearrange, create, delete topics, etc so you can delete the cpd and get the latest files after these changes to ensure everything is synced. If you can, plan for one person to make all of these changes at one time to minimise how often you have to delete this file. And backups outside of VSS are also useful to deal with RH deleting added files and adding deleted files in source control because it was out of sunc with VSS - while possible to get everything back from VSS, sometimes it's just easy to copy from a zip backup. Note from Peter GraingeHaving read through that, you might understand why I avoid source control. It does have its place and in some scenarios it is the only sensible solution. However, the answer is to keep it simple and robust as Author Care said. In my world I can do that without source control. Many thanks to those who provided great responses to La Kisha's question. The full thread can be found on the RoboHelp Forums, click here. |
|
1 |
20 Jul 2009 |
Laurin Marden and Leon Descouteaux |
What not to put into source controlWhat not to put into source control I don't normally cover source control issues but regularly people have problems with what should and should not go into source control. Laurin and Leon have often responded so I thought it might be worth pinning Laurin's latest reply here. "There aren't very many files that RoboSource Control excludes. Let's see, a quick tally of my RH6 webhelp project shows the following to be excluded: * projectname.cpd That's not very many, but the consequences of adding them to RSC are severe--things get very messed up, very fast. That's why I always let RH control the upload into RSC. Not an option if you're not using RSC, I realize." UPDATE 5 July 2020 The following information was posted in this thread by an Adobe staff member in relation to RoboHelp 2019 New UI. "Files inside .rh folder need not be checked-in to version control. Topics kept inside top-level-foldername/.rh/.username.fr.cache/contents have topic files whose text is saved here for find and replace feature. We find in these files for text search. Files like .username.db.json is for reading the project while opening. Project open is faster with this cache file. File .username.preferences.json contains detail related to recently opened files, generated outputs etc. So yes, recommendation is not to check-in these files to version control. We make a ignore list of these files for our out of the box version control sysytems like GIT, TFS etc." |
WebHelp (RoboHelp Classic)
|
No |
Date |
Credit |
Gem |
|
21 Classic Only |
07 Aug 2017 |
Peter Grainge |
Can WebHelp be hosted on Dropbox?.Can WebHelp be hosted on Dropbox?. The short answer is No. See this page in Dropbox's online help. The answer is probably the same for similar services as their servers would have to be configured as web servers and require substantial band width. Please let me know if you find otherwise. |
|
19 Classic Only |
24 Jan 2016 |
Adobe |
Search Error - Failed to initialize database.Search Error - Failed to initialize database. LykkeErik reported I had this problem in RoboHelp 9 and 11. Here is what I did to fix it (Ashish at the Adobe Help Desk provided the names for the MSXML files to load...and a lot of troubleshooting as well). 1. Delete the .cpd file from the (affected RoboHelp project folder. 2. If using RH11, ensure that RH11 is patched through 11.0.4. 3. Install the following Microsoft updates on your computer (the KB numbers are important. There are many updates with the same name, but different KB numbers): -- MSXML 4.0 Service Pack 2 (KB954430) -- MSXML 4.0 Service Pack 2 (KB973688) -- MSXML 4.0 Service Pack 3 Parser (KB2758694) 4. Reboot your machine (even if it doesn't ask you to). 5. Regenerate your project. Doing this worked for broken search functions in both my RH9 and RH11 projects. Update 23 Feb 2017 - If you have RoboHelp 2015, just make sure you have all patches applied. With Service Release 2, RoboHelp was made MSXML version agnostic. |
|
17 Classic Only |
18 Mar 2013 |
Willam van Weelden |
Occasionally someone asks how they can add a toolbar button that opens another webhelp output. Willam's solution is very simple. Create a toolbar button in the skin and add the line below in the onClick event. top.document.location='myurl'; Subsitute "myurl" with the path from root of the first help output to the start page of the target webhelp. |
|
14 Classic Only |
30 Dec 2012 |
Willam van Weelden |
If a WebHelp topic is opened directly, the navigation pane is not visible. The properties of the SSL can be set to show a link that will open the navigation pane but with a simple script, you can force WebHelp to always show the navigation pane. The method was on the Help Essentials site that is now closed. Click here for a PDF version. |
|
11 Classic Only |
23 Feb 2012 |
Willam van Weelden |
Browser Back and Forward buttons.Browser Back and Forward buttons. If your webhelp runs in a standard browser window, users have access to the browser's back and forward buttons. If you developers deliver the help in a chromeless window, those buttons will not be available by default so you may wish to add your own as part of the help. Open your skin in the skin editor and click the + icon under Toolbar In the Text tab, you must enter an Item name. Then enter the text required and / or the image required. (RoboHelp's Gallery has lots of arrow images that you can use.) In the Action tab, click Javascript and enter the required code in the onClick field. For the Back Button top.frames[1].frames[1].history.go(-1); For the Forward Button top.frames[1].frames[1].history.go(+1); Make sure you tick those buttons when you generate the help or they will not appear. |
Frameless and Responsive Templates (Skins)
|
No |
Date |
Credit |
Gem |
||||
|
24 |
10 Jun 2024 |
Adobe |
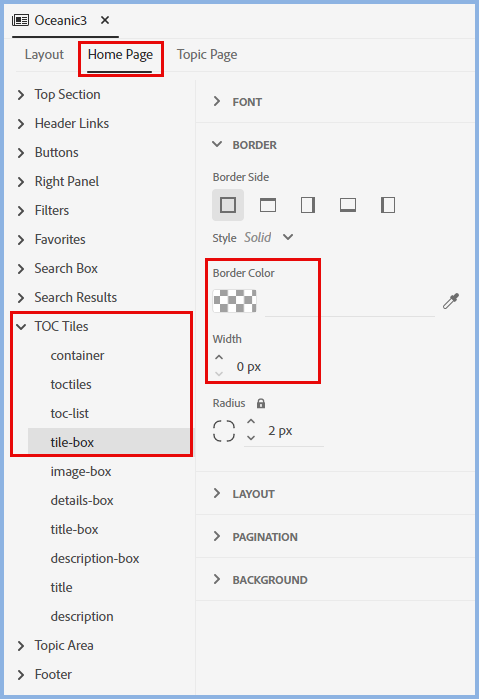
Remove border and shadow around home page tilesRemove border and shadow around home page tiles By default, tiles are surrounded by a border that has a shadow. The border can be changed in the template editor but the shadow cannot. There is a workround for that. Border Change the colour where indicated and set the width as desired using 0px if you do not want a border.
Shadow The option to edit the shadow is not available in the template editor. It can only be removed by directly editing the layoutDiff.css file. That can be found in Path to Your Project\publish\skins\template name. Search for .RH-LAYOUT-HOMEPAGE-TOC-tile-box and add box-shadow: none; This has been reported to Adobe. See RH-9087 | Tracker (adobe.com) Please add your vote to get it priorised.
|
||||
|
23 |
08 Jun 2024 |
Peter Grainge |
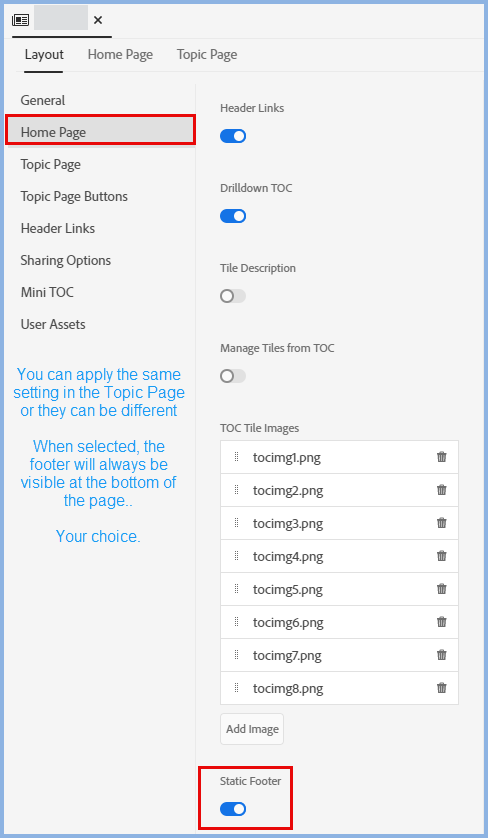
The first thing to understand here is that there are three types of footer in Adobe RoboHelp.
|
||||
|
22 |
26 Apr 2024 |
Peter Grainge |
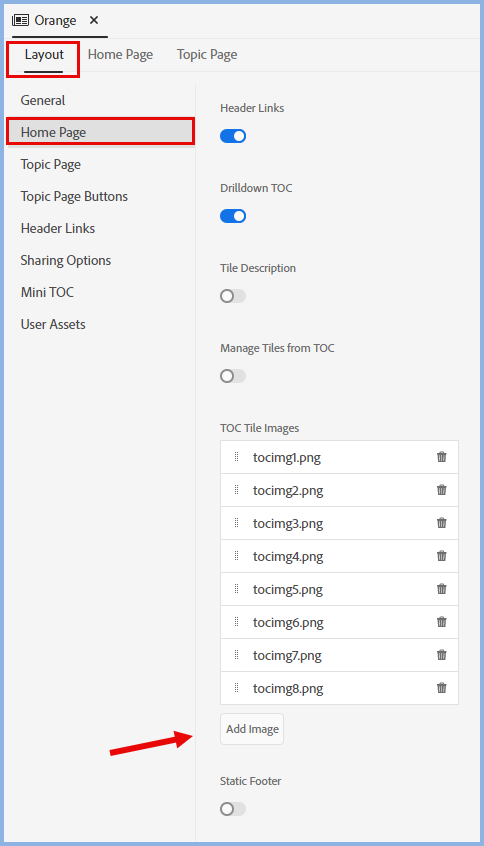
How to change tile imagesHow to change tile images To keep things simple, I have kept the new images the same size as the default tile images, 288px by 192px. You can have different sizes but that will require changes to the tile size.
If you later need to replace the default images, for RoboHelp 2022 they will be found at C:\Program Files\Adobe\Adobe RoboHelp\resources\data\template\layouts\frameless. |
||||
|
21 |
19 Jan 2024 |
Adobe |
Template change has caused a problem.Template change has caused a problem. Sometimes I see posts on the forum where a user has messed up their template somehow but they don't know which change has caused the problem. The problem they face is not know what customisations have been made. Adobe gave me this tip.
All customisation is saved in layoutDiff.css so by comparing the two files, you can see what changes you have made. You could open both files in a text editor and visually compare them. Hopefully you will be able to spot a likely candidate for what is causing the problem. Otherwise it is a case of reversing a few differences at a time until the template works again. |
||||
|
20 |
23 Aug 2021 |
Peter Grainge |
Which template (skin) type should I use?Which template (skin) type should I use? See Skins / Templates. |
||||
|
19 |
19 Jan 2021 |
Adobe |
Hide the file path in Search Results.Hide the file path in Search Results. This method was found for RoboHelp 2019 New UI but it should work for later versions. |
||||
|
18 |
21 Jul 2020 |
Adobe |
White border around topics in Charcoal Gray skin.White border around topics in Charcoal Gray skin. No matter what you do in the skin editor or CSS, you can't get rid of this white border alongside and below your topics?
In your output locate the folder (template\<skin name>\layout.css), towards the end of the file. By default it will be set to a hex value as shown. div.topic { For an RGB value it would be as below with your values. div.topic { In other skins you could create a CSS file with this definition and add it to User Assets. Unfortunately that option is not available in this skin so you need to make that change whenever you generate. |
||||
|
17 |
08 May 2020 |
Peter Grainge |
Second home page.Second home page. When you click one of the tiles, what happens next depends on the structure of your TOC and a skin setting. By default, it the tile (top level book) has nested books, you will see a second home page. The order of the tiles in the second home page is the same as the first home page, as set in the skin's Layout > Home Page. That cannot be changed. What you can do is deselect Drill Down in the skin's Home Page settings. Then the help will open at the first topic or book below the tile clicked. |
||||
|
16 |
08 May 2020 |
Jonathan Smith & Peter Grainge |
For some projects, the tiles are just too large. Resize the tile box and the text doesn't move with it. Once Jonathan had explained one change and some other bits, I managed to get what was wanted. These details were with the Oceanic frameless skin but should be similar with other skins that have a home page with tiles. Open the skin in the skin editor and go to Home Page > TOC Tiles. tile-box Change the height and width as required. I set them both to 100 px. details-box Change the height and width as required. I set height to 50px and width to 80 px. Click the icon next to margin and set a top and bottom margin. I set top to -80px and bottom to -6px. Note these are minus values. The top brings the text closer to the icon and the bottom gives additional space between two rows of icons. If you have different tile-box dimensions, you will need to change the margins until get what you want. title-box No changes made here. title With the reduced size tiles, you will probably need a reduced size font. I reduced it to 0.8 rem. You will also need to watch for long titles. They will get truncated but the user can hover over them to see the full title. images As you can see, the original images no longer fit. Either substitute the original by creating your own to fit the tile size you have set or resize the originals. The can be found in the publish > skins folder of your project.
The other information that Jonathan gave that may help the more technical is this. "The tile-box sits behind the details-box so reducing the height of that won’t affect the position of the details-box. There are basically 4 layers starting with the tile-box. The details-box, the title-box, and the title are all sat on top in that order." |
||||
|
15 |
22 Apr 2020 |
Adobe and Peter Grainge |
Change TOC, Index and Other Skin Fonts.Change TOC, Index and Other Skin Fonts. Classic VersionsTo change the TOC and Index fonts using Classic Versions, locate and open the layout.css for the skin. - If you know the font required will be on the users' machines you only need the toc-holder and/or idx-holder definitions shown in blue. The "font-style" and "font-weight" lines are optional. - If you cannot be certain of that, you need to use the @font-face method and include all three definitions. How is described elsewhere on my site. Click here. To edit other skin fonts, you need to first identify the style name using the method described for the New UI versions, then edit the layout.css file as described above. **************************************** @font-face { **************************************** New UI VersionsResponsive SkinsFor the TOC and Index in responsive skins, see the instructions above but add the above definitions to a CSS named as you wish. Add that file to User Assets as described below. For other parts of the skin see the instructions below to see how to identify the style name and then amend it as in the prevous paragraph. Frameless SkinsIf you know the font required will be on the users' machines, use the skin editor for frameless skins. For fonts where you cannot be sure the font is on the user's machine, you still select the required font in the skin editor but you also need to add the @font-face definition to a CSS file that you then add to User Assets.That is described in more detail in the demo on my site. **************************************** Identifying the StyleGo to the skin editor and locate the field to be edited.
Set the font to something that you know is not used elsewhere in the skin, Broadway in this example and generate an output. New UI UsersIn the output locate the Template folder in the skin used and go to userstyles.css. Search for the font name in that file. Using this example, you will find the style below. .RH-LAYOUT-HEADER-logo-box { Copy the style definition but do not amend it there. Add the style to a new CSS file or one that you are already using in User Assets. In the skin editor go to Layout > User Assets and click Add Asset. Browse to the CSS file and add it. You also need to add the font file (Quicksand-Regular.otf) to User Assets, Classic UsersLocate the layout.css and search for font name there. This file may open with all the styles in a single line, if it does download Brackets and use its Beautify feature to make it easier to read. Edit the definition there. You will need to add the @font-face definition to the file as described in the demo on my site. |
||||
|
14 |
06 Apr 2020 |
Peter Grainge |
The requirement was to have a wide company logo without it stretching and distorting to fill the header height and requiring too much width. Let's say the required logo was the red area you see below.
What was happening was that was the logo stretched to fill the height and became indistinct, it also wanted too much width in the header. The solution was twofold. What I did was increase the canvas height using Snagit. Note canvas height rather than image height. That gave me space above and below the image which retained its original size. That space was then filled with the same colour as the heading. That made the total image height greater so it didn't need to stretch and retained its clarity. In the skin editor I then replaced the original image with this new one. I also adjusted to Logo Width to suit the image. The end result was that the logo part of the image was the size required and the area above and below looked like it was part of the header. |
||||
|
16 |
20 Jun 2018 |
Willam van Weelden |
Willam explained how to do this on the RoboHelp forums. |
||||
|
12 Classic Only |
20 Jun 2018 |
Willam van Weelden |
Adding your own layouts to the Gallery.Adding your own layouts to the Gallery. This information for Classic versions only. If you have created your own layout and want it to appear in the Gallery, export the layout as a SLZ file to |
||||
|
11 |
20 Jun 2018 |
Mark Dennett |
Mark did. See his answer on the RoboHelp forum. |
||||
|
10 |
11 May 2018 |
Jeff Coatsworth |
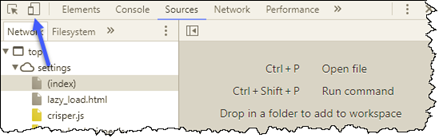
Preview output by device screensize.Preview output by device screensize. You can simply generate an HTML5 output and when viewing it you change the size of the window. That way though you cannot see the dimensions of the point at which a layout changes. If you use the Chrome browser, the developer tools can come to the rescue. In Chrome open the output you want to view, then click the top right menu and click More Tools > Developer Tools or press CTRL + Shift + I. Then click the icon shown or press CTRL + Shift + M.
You can manually drag the window around and you will see the dimensions changing or you can input your settings. |
||||
|
9 |
28 Feb 2018 |
Willam van Weelden |
Long book names in Indigo layout.Long book names in Indigo layout. When a book name is too long for the space in this layout, it gets truncated and followed by an ellipsis, as below.
A forum poster asked how to get rid of the ellipsis. Willam responded:- If you search for the text 'text-overflow: ellipsis;' that will take you to the correct location. The TOC grid consists of a DIV element with a hyperlink and a label. The label truncates the text if it doesn't fit. By removing the white-space, text-overflow and overflow properties, you can get the text to show up. From there on, you can change the DIV element and hyperlink to correctly show the text you want to. I asked Willam about changing the font size as well or instead as I thought that too might help. Willam then added the following to the post:- You can change the font size of the blocks so that they show more content. A smaller font set will allow for more text to be displayed. In your CSS, locate the first line below and add the font-size line below: div.frontpage-toc.grid-5 div span.label { font-size: .75rem; } If you add a font size as above, more text will be displayed. The bolded 5 is the number of tiles selected to be displayed at the front page. So if you use a four grid row, search for grid-4 instead of grid-5. There is no need to set the font size for every device separately. REM is a percentage of the page's base font size. You could also use EM or %. REM is generally easier to work with. Avoid point sizes or other set font sizes as they will not scale very well on different devices. |
||||
|
6 |
17 Feb 2018 |
Willam van Weelden |
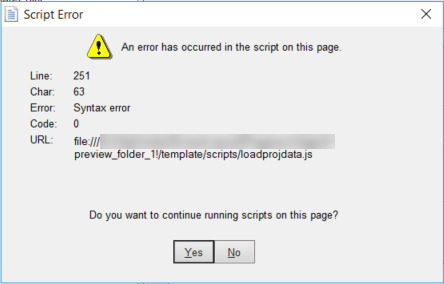
Script error when previewing a layout.Script error when previewing a layout. Seeing a script error like this when previewing an HTML5 layout?
See Willam van Weelden's solution on Iconlogic's blog. |
||||
|
5 |
01 Feb 2018 |
Guy Alroy and Adobe |
Classic VersionsClassic versions only support Responsive HTML5 help. To open responssive outputs with a filter applied, use the format:- path\index.htm\?filter=filtername - where index.htm is your start page name. The filter name should be as seen by the user. New UI Versions RoboHelp 2019 onwardsIn both frameless and responsive outputs you can specify a default tag so that the help always opens with that filter applied. If you need to supply a URL to open the help with a filter applied, format it as below. url?f=taggroup:tagname where URL is what would open your help without any filter applied. Note that it is the tag group that is used, not any group set up in the Dynamic Content Filters. |
||||
|
4 Classic Only |
09 May 2017 |
Willam van Weelden |
Using Map IDs, it was the case that if you opened a topic directly, it would display with the full layout including the TOC. After applying Update 4 to RoboHelp 2015 or in RoboHelp 2017, that will no longer be the case. Instead the topic will open with just a Show link (the term can be changed in the LNG file). This will also occur if you use URLs in the format PathToTopic/topic.htm. The reason behind this is given on Adobe's site and is quoted below. When a topic in Responsive HTML5 output is accessed by clicking on its direct link from Web search, the link gets redirected and the responsive layout is applied on this topic. The Web crawlers (including Google) do not index pages that have JavaScript redirects applied on them. This meant that authors with their help online were not getting the topics found by Google. To fix this, the redirect has been removed. If you do not want your topics online or found by Google, here's what to do to bring back the full layout, with thanks to Willam. USING URLs Use the format PathToStartPage/index.htm#t=PathToTopic/topic.htm (Note the #t= between the home page call and the topic call.) USING MAPIDs By adding a small script in your topics, you can force the skin to be shown. Nothing needs to change and your users will never see the 'show' link. It basically returns to the behaviour of RH2015 before Update 4. The downside is that this particular script doesn't discriminate between CSH calls and regular links where you may want to just open the topic. Though the script can be amended. Simply add the script below to the bottom of your topics. You can use a master page footer or manually add the code before the </body> tag. Don't add the script in the <head> as that won't work. <script type="text/javascript"> Update 22 September 2017 - This has been changed in Update 2 to RoboHelp 2017. CSH will now open showing the TOC etc whilst still being capable of being indexed by Google where the help is available on the internet. |
||||
|
3 |
09 May 2017 |
Peter Grainge |
If content filtering is applied, the radio buttons work but do not show what has been selected in Firefox. Works fine in IE. This layout was removed in RoboHelp 2017 Update 2 because of various other issues that were found. |
||||
|
2 |
07 May 2017 |
Peter Grainge |
Issues with Merged Help using Responsive layouts.Issues with Merged Help using Responsive layouts. Using the Indigo layout -
Using the Azure Blue layout:-The TOC synchronises and this layout does not have breadcrumbs. Otherwise it has the same issues as the Indigo layout. It would therefore seem that merged HTML5 help only works properly if the full merge is accessed and available. Where merged help is created to break the project for authoring purposes, Items 2 3 and 4 will not be an issue and Item 1 is really just cosmetic. Of more importance are the scenarios where developers point to a child project.
UPDATE 8 May 2017: Re Item 4, it seems that merged HTML5 differs from merged WebHelp if less than the full merge is to be installed. With WebHelp, you could just delete the child output folder. With merged HTML5, it is necessary to generate the parent again with that child removed from the list of child projects in the TOC. |
||||
|
1 |
18 Mar 2017 |
Willam van Weelden |
Adjust TOC Width.Adjust TOC Width. See the response from Willam in this thread. |
 Note that whatever you read elsewhere, some changes may remove this line from layoutDiff.css so check each time you generate an output.


Miscellaneous
|
No |
Date |
Credit |
Gem |
||||||||||||||||||||||||||||||||||||
|
69 |
05 April 2026 |
Peter Grainge |
Contacting Adobe SupportContacting Adobe Support If you need to contact Adobe Support, see the email link #2 bottom left at https://helpx.adobe.com/contact/enterprise-support.other.html#robohelp for your Adobe Support options. The email link tcssup@adobe.com is strongly recommended above all other options as it reaches a team dedicated to Technical Communication Suite products including RoboHelp. The other options take you to a team that support all Adobe products and they focus more on the Creative Suite products. They may not have the level of RoboHelp knowledge you need. |
||||||||||||||||||||||||||||||||||||
|
68 |
10 Jul 2024 |
Peter Grainge |
Downgrading a ProjectDowngrading a Project It is always recommended that you do not downgrade a project. That is because internal files can change and the lower version may not read them at best and can corrupt them at worst. A glaring example of this was illustrated by a bug in 2022.4 that caused issues with generating CHM files. It was found that certain common characters such as quotes were replaced in the output with the undrecognised character below.
Generating the same project in 2022.3 worked but it also corrupted the variables file as its structure was different. Upgrading back to 2022.4 did not repair the damage. You have been warned. What to do if there is no option?If the issue is with generating an output.
If the issue is with content. You can try the above but it is with risk and not recommended. First post to the forum to see if it is a known issue and, if not, go to Adobe Support. The email link to tcssup@adobe.com is recommended as it reaches a team dedicated to Technical Communication Suite products including RoboHelp. Beyond that it is your own risk so backup carefully and frequently. Your first change might work and your second change might wreck the project irretrievably, hence my warnings about backing up frequently. Try to work around the issue if you can. |
||||||||||||||||||||||||||||||||||||
|
67 |
19 Jan 2024 |
AthensSlim |
Create a Letter Size PDF using Save As PDFCreate a Letter Size PDF using Save As PDF AthensSlim wanted to use Save As PDF but with the size set to Letter Size. Whilst you can set the page size when generating a PDF output, that option is not there with Save As PDF. AthensSlim's solution was to add this to the CSS used by the topic. @page { |
||||||||||||||||||||||||||||||||||||
|
66 |
04 Jul 2021 |
Help Essentials |
Topics missing after upgrade from Classic to New UI.Topics missing after upgrade from Classic to New UI.
After upgrading from Classic to the new UI some users have found that some or all of their topics are not showing in the Contents Panel. The most likely cause is missing or corrupt FPJ files in the Classic project. There is or should be an FPJ file in every folder containing a list of the topics and sub-folders in it. The upgrade process relies on that file. You can examine the files in a text editor. This script runs through your Classic project and corrects corrupt files and creates new ones where required. See Scripts. After downloading the script, backup your project and then go to Tools > Browse Scripts and browse to where you saved it. Close your project and run the script. Then run the Upgrade process again. |
||||||||||||||||||||||||||||||||||||
|
64 Classic Only |
07 Oct 2011 |
Gunjan Kumar |
Add a CSS table to a snippet.Add a CSS table to a snippet.
CLASSIC VERSIONS If your CSS file has tables defined, you will not see them if you are trying to add a table to a snippet.
What you need to do is click this icon and select the CSS that has the required table(s).
Then the tables in the selected CSS will appear in the Available Table Styles and can be added. They will work without problems provided all your topics use the same CSS as selected for the snippet. If you use multiple CSS files, then each CSS will have to have the table defined. The definitions can be different but the table name must be the same. Thus each CSS must have a table style such as MyMainTable but in one CSS all the borders could be blue whilst in another they could be red. The key point is that the CSS for all topics using the snippet must have a table named MyMainTable. |
||||||||||||||||||||||||||||||||||||
|
63 Classic Only |
07 Oct 2011 |
Willam van Weelden |
Show search results when find is in dropdowns and expanding text.Show search results when find is in dropdowns and expanding text.
CLASSIC VERSIONS RoboHelp's search will find results that are in a dropdown or expanding text but the user will not see them when they go to the topic. See Scripts so that clicking the search results will go to the topic with the dropdown open or the text expanded to see the results. |
||||||||||||||||||||||||||||||||||||
|
62a Classic Only |
09 Apr 2011 |
MeWrite and Lee Passey |
RoboHelp slow and unresponsive - Check the number of publish location URLs.RoboHelp slow and unresponsive - Check the number of publish location URLs.
CLASSIC VERSIONS This problem crops up from time to time and in most cases it is because the CPD file has become bloated. The solution is usually to delete the CPD as covered below. There were two threads though where this did not fix the problem in RoboHelp 8. See this thread and this thread. There you will see that the initial cause was pinned on the number of layouts but I had seen projects with many more that worked just fine. Eventually MeWrite identified that it was not the number of layouts but the number of URLs they contained. Lee Passey then identified a workaround. He identified that the list of publication servers is stored in an XML file named "pblsvrs.sss" and by swapping different versions of that in and out of the project, performance became acceptable. |
||||||||||||||||||||||||||||||||||||
|
62b Classic Only |
19 Jan 2011 |
Peter Grainge |
Want to clear out the list of used build expressions?Want to clear out the list of used build expressions?
CLASSIC VERSIONS To delete the build expressions listed in the Conditional Build Expression dropdown, set the value in all layouts in the project to None. Close the project and delete the PSS file. Reopen the project and the dropdown will not contain any expressions. |
||||||||||||||||||||||||||||||||||||
|
60 Classic Only |
18 Aug 2008 |
Rick Stone |
Change the default width of the Horizontal Line.Change the default width of the Horizontal Line.
CLASSIC VERSIONS Typical Rick! After I told someone that I didn't think you could change the default width when you use RoboHelp's Insert | HTML | Insert Line function, Rick posted the answer! Neat trick sir. Here's what Rick posted. In RoboHelp 2015 and above it's Insert | HTML |Text Box | Horizontal Line and the version below will be your version rather than 7.00. You have to close RoboHelp and open your Registry Editor. All disclaimers apply. Don't come cryin to me if you munge your registry and don't have a backup. Yadda yadda yadda. Got Regedit open? Cool. Try navigating to this HKEY: There are many many entries in this spot. You want to locate the one that reads: Double-click that entry and you should get a dialog allowing you to change its value. Mine looked like this before: I modified it and now it looks like this: Close Regedit and restart RoboHelp. Insert a Horizontal Rule and bask in the glory of your new desired width. |
||||||||||||||||||||||||||||||||||||
|
59 Classic Only |
23 Feb 2017 |
Peter Grainge |
Project errors or CPD file getting bigger than you like?Project errors or CPD file getting bigger than you like?
CLASSIC VERSIONS From time to time there are posts from people who are finding their project seems a bit slow and they have found the CPD file has grown larger than they are used to seeing. Alternatively they are experiencing an error in one project only. Often people, myself included, will suggest deleting the CPD file and letting it rebuild. As you can see in my topic on Opening Projects, you should not lose anything if you are using RoboHelp 7 or above. In RoboHelp 8 and above there is an option to automatically delete the CPD so that a new one is created on opening a project. Don't also delete the XPJ file as I have seen some people suggest. That is a last resort. See Opening Projects for more about that. I have seen people suggest that if authors have a copy of Microsoft Access, they use that to compact the database (the CPD). This is a standard procedure on any Microsoft Access database that users of that program will be familiar with. It seems a pointless solution to me as deleting the CPD is quicker and supported by RoboHelp. Also all compacting a database does is remove wasted space. RoboHelp rebuilds it using data from other files and that can have the added advantage of removing errors. For that reason provided you are using a version of RoboHelp with the Clear Project Cache option, deleting the CPD file is the recommended option. RoboHelp 8 introduced the option to automatically delete the project cache (the CPD file) every time you open RoboHelp. Look in File > Options (Tools > Options before RoboHelp 2015). Note this setting applies to all projects, not just the one that was open when you applied the option. With the project closed, delete the file manually if you prefer |
||||||||||||||||||||||||||||||||||||
|
58 Classic Only |
09 May 2007 |
Doug Wood |
The Parameter is Incorrect.The Parameter is Incorrect.
CLASSIC VERSIONS A small number of people have reported getting this message when trying to delete topics. Initially the only solution was to create a new project and import all the topics and the contents of the HHK and HHC files. Topics could be deleted on another PC with RoboHelp installed but that did not solve the problem next time you want to delete something. Eventually Doug Wood came to the rescue. His colleague Calvin Wilson ran into the problem and Doug used some tools to compare files in a project. He identified differences in the PSS file and that if you delete it RoboHelp rebuilds with no apparent issues. I have since had confirmation from Adobe that this is a file that can be deleted safely. So just close your project, use Windows Explorer to delete the PSS file and then reopen your project. You will lose some information about when a Single Source Layout was last created but the problem will be solved. |
||||||||||||||||||||||||||||||||||||
|
55 Classic Only |
20 Jun 2004 |
Roger Nilsson |
Search in Page.Search in Page.
CLASSIC VERSIONS Various javascripts are available to provide users with a search function that is limited to the current page. For example: http://www.dynamicdrive.com/dynamicindex11/findpage.htm (This snippet originally pointed to another site but the script has been removed. The link above seems to do the same job but I have not tested it.) |
||||||||||||||||||||||||||||||||||||
|
54 |
25 Apr 2021 |
Stefan Getz |
How to import a PDF into the new UI Roboehelp and how to fix odd characters in an HTM fileHow to import a PDF into the new UI Roboehelp and how to fix odd characters in an HTM file
ITEM WRITTEN FOR NEW UI. TRY IT FOR CLASSIC Please see the attached PDF file. |
||||||||||||||||||||||||||||||||||||
|
53 |
14 Jan 2020 |
Adobe |
Search Issues 2020.Search Issues 2020.
NEW UI The search funtionality changed with the new UI and in the 2020 version there were many improvement. Nonetheless questions arise and Adobe have responded to these posts, hopefully their answers that include the search logic will help you. |
||||||||||||||||||||||||||||||||||||
|
52 |
17 Aug 2020 |
Peter Grainge |
Where is RoboHelp's TMP file for New UI versions?Where is RoboHelp's TMP file for New UI versions?
NEW UI Look in C:\Users\Username\AppData\Local\Temp\RHTMP. |
||||||||||||||||||||||||||||||||||||
|
51 |
20 May 2020 |
Adobe |
What does RoboHelp Server do?.What does RoboHelp Server do?.
View this recording of an Adobe webinar. Click here. |
||||||||||||||||||||||||||||||||||||
|
50 Classic Only |
30 Nov 2019 |
Adobe |
Change TOC and Index font in Responsive output.Change TOC and Index font in Responsive output.
CLASSIC VERSIONS This snippet can now be found as Item 15 in the HTML5 and Skins section. |
||||||||||||||||||||||||||||||||||||
|
49 |
23 Jul 2017 |
Peter Grainge and Adobe |
Need numbered headings in RoboHelp 2019?Need numbered headings in RoboHelp 2019?
NEW UI Click here to see how it works. Click here to download the RoboHelp 2019 project. You can upgrade it to later versions. |
||||||||||||||||||||||||||||||||||||
|
48 Classic Only |
31 Mar 2017 |
Adobe |
Which versions of Windows and Office work with which versions of RoboHelp.Which versions of Windows and Office work with which versions of RoboHelp. | ||||||||||||||||||||||||||||||||||||
|
47 |
21 Mar 2017 |
Adobe |
Need RoboHelp's online help for older versions?Need RoboHelp's online help for older versions?
Click here to view the help for versions from RoboHelp 7 up in HTML format or download a PDF. |
||||||||||||||||||||||||||||||||||||
|
46 |
Updated 27 Dec 2023 |
Peter Grainge |
Download previous versions of RoboHelp.Download previous versions of RoboHelp.
It used to be possible to download previous versions quite a way back. That has changed. Now you can only download the current and previous versions and any updates issued for those versions. At the time of writing for example that means 2022.3, 2022.2 2022.1 and 2022.0 for current version and the initial release of 2020 and all updates. If you have a subscription licence and want 2019 you will have to go to Support. It's the same for users of Classic versions. I believe you will need proof of purchase for Classic versions and you will need your serial number. See https://helpx.adobe.com/contact/enterprise-support.other.html#robohelp for your Adobe Support options. The email link tcssup@adobe.com is recommended as it reaches a team dedicated to Technical Communication Suite products including RoboHelp. |
||||||||||||||||||||||||||||||||||||
|
45 Classic Only |
25 Jan 2016 |
Peter Grainge |
Using RoboHelp with 64 bit versions of Word.Using RoboHelp with 64 bit versions of Word.
In RoboHelp 2015 at least, the 64 bit version of Word is officially supported. However Microsoft warn that for compatibility with other apps, not just RoboHelp, it is best to use the 32 bit version of Word. There are two pages on Microsoft's site that cover this issue. Click here to see what Microsoft say about the 64 bit version. Note the first heading is "32 bit version is recommended for most users". Click here to see Microsoft's page on choosing the 32 bit or 64 bit version of Office. Note the section "Limitations of the 64 bit version of Office". |
||||||||||||||||||||||||||||||||||||
|
42 |
25 Jan 2016 |
Willam van Weelden |
Deleted images still showing in File Explorer.Deleted images still showing in File Explorer.
CLASSIC VERSIONS When you delete an image from a topic, RoboHelp does not delete the image from disk. When you have been working on the same project for a long time, there is a good chance that your RoboHelp project folders contain many unused images that show in File Explorer but not in Project Manager. This can be confusing. But how do you know which images are still used and which images can safely be removed? Click here for a free script that will delete them from File Explorer as well. NEW UI Look at the Unused Files Report. |
||||||||||||||||||||||||||||||||||||
|
41 Classic Only |
25 Jan 2016 |
Willam van Weelden |
Batch import files that have gone walkabout.Batch import files that have gone walkabout.
CLASSIC VERSIONS Sometimes people post to the forum that they have opened a project and there are red Xs against a lot of topics and all in different folders. They are still there in File Explorer and importing them one by one is a pain. No more thanks to Willam. Click here for a free script that will restore them into Project Manager. |
||||||||||||||||||||||||||||||||||||
|
39 |
25 Jan 2016 |
Adobe |
Search all words not displaying results.Search all words not displaying results.
A user reported that search worked just fine until Show Results That Include All Words was selected. Adobe responded that the search included words that were in the Stop List. The Stop List is there so that you can exclude specific words so it was doing its job. Either users must be trained to not use common words (not practical) or you must remove from the Stop List the words that cause problems in your help. |
||||||||||||||||||||||||||||||||||||
|
38 |
24 Jan 2016 |
Peter Grainge |
Paste from Word without the formatting.Paste from Word without the formatting.
When you import from Word the HTML usually includes stuff only Microsoft apps need, typically MSO Normal. The oft quoted solution to avoid that is to paste into a text editor and then into RoboHelp. Along the way the inline styling is lost. It is possible however to paste straight into Word and then quickly remove all the inline styling. Paste straight into RoboHelp and then select what you have pasted. Then locate Clear Formatting and it removes all inline styling. In New UI versions click the Clear Formatting icon in Properties or paste in using Shift V. In RoboHelp 2015 see the Edit > Character. There is an icon with the letter A and a red X. In RoboHelp 11 see Format > Clear Formatting. |
||||||||||||||||||||||||||||||||||||
|
37 Classic Only |
24 Jan 2016 |
Rick Stone |
RoboHelp locks up / You cannot see a dialog that you tried to open.RoboHelp locks up / You cannot see a dialog that you tried to open.
CLASSIC VERSIONS You start a process and RoboHelp appears to lock up failing to respond to any keystrokes or mouse actions. Sometimes a dialog goes off screen so you cannot see it is requiring an input. This can happen when you have been using two monitors and then change to one. Try pressing the Windows key plus the left arrow key a couple of times. |
||||||||||||||||||||||||||||||||||||
|
33 |
24 Oct 2012 |
Peter Grainge |
Which help format should I use?Which help format should I use?
On the RoboHelp forums we regularly see users not quite sure which help format they should use. Hopefully this snippet will help. The first consideration is where the developers are going to install the help. Will it be on a server, on the user's desktop PC, or on a mobile device such as a smartphone or a tablet? Let's look at the output options available in RoboHelp.
|
||||||||||||||||||||||||||||||||||||
|
32 |
05 Aug 2012 |
Peter Grainge |
Thinking about DITA?Thinking about DITA?
Are you wondering whether DITA is right for you organisation? If you are, then start with this link, it provides some questions and answers that will help you decide. Click here for Cherryleaf's article (Added 18 March 2017). |
||||||||||||||||||||||||||||||||||||
|
30 |
06 Mar 2011 |
Pete Lees |
Include string only when printing.Include string only when printing.
CLASSIC VERSIONS - NOT TESTED IN NEW UI If you want some content to only be included when a user prints a topic, try this. Add the following to your CSS. It creates a class called copyright and tells it not to display on screen but to display when printed. As written below, the print will be in the same style as Normal but you can change that to suit. @media screen { p.copyright {display:none;} } @media print { p.copyright {display:block;} } Then write your content and apply the copyright class. It will look something like this. <p class="copyright">Copyright <?rh-symbol_start name="Copyright" ?>©<?rh-symbol_end ?> 2011 My Company Name</p> This was written for someone who wanted a copyright notice to appear in print, hence the class name. You can change it to whatever you want. |
||||||||||||||||||||||||||||||||||||
|
24 |
04 Aug 2009 |
Peter Grainge |
Is there a limit to the size of a Word doc file.Is there a limit to the size of a Word doc file.
Yes and no. There is a limit of 32 mb of text but the file size can be bigger because of graphics etc. |
||||||||||||||||||||||||||||||||||||
|
23 |
01 Mar 2009 |
Peter Grainge |
What is the difference between Related Topics and See Also.What is the difference between Related Topics and See Also.
With Related Topics when you insert the button you are presented with a list of topics in the project and you link those to the button. With See Also you select a Keyword when you insert the button. Those keywords are ones that you have entered as you create topics. You don't have to stop and figure out which topics get displayed. RH displays all the topics where you have entered the keyword in the properties. So every time you create a topic about Pop Music you enter the keyword Pop, every time you create a topic about Classical Music you enter the keyword Classical. When you add a See Also, you select Classical and all the topics with that keyword will display when the user clicks the See Also button. |
||||||||||||||||||||||||||||||||||||
| 19 | 23 Jun 2008 | Unknown | New to authoring?New to authoring?
I saw this link while browsing and made a note of the site below but not of where I found the link. So my thanks to whoever found the site, whoever you are! OK. Sometimes the problem is not learning the tool but learning the job. That's where this link might help you. I don't agree with all the detail but nonetheless there is some good information. Approach what you read this way, as you read the pages, don't treat them as gospel but as food for thought. There's certainly more information about your new environment here than anywhere else I have found. Click here. to go to Wikiversity. Enoy the course! |
||||||||||||||||||||||||||||||||||||
| 12 | 13 Oct 2007 | Rick Stone / Gravenstein | Do I need to deliver all the WH folders and files?Do I need to deliver all the WH folders and files?
People often ask whether or not it is necessary to publish all these files. My standard reply is "only if you want the help to work!" The short answer is Yes. In response to a recent forum thread on this subject Gravenstein posted: The RoboHelp help topic "Output Files for WebHelp" states:
"...The output files located in !SSL!\WebHelp\whdata are HTML/JavaScript data files used in DHTML versions of WebHelp running on earlier browsers (such as Internet Explorer 4.)"
"...The output files located in !SSL!\WebHelp\whxdata are XML data files used in Java applet and DHTML versions of WebHelp running on later browsers (such as Internet Explorer 5 and Netscape Navigator 6.)"
Reading that, it would seem like you could delete at least whdata (and maybe whgdata) if you knew your users were running on a late-model IE only. I haven't actually done any testing on this, but I have thought about it. Is there more to it than meets the eye? Gravenstein indicated that in her project these files amounted to about 300mb. My take on that is: We are talking about less than half a CD here and into freebie memory stick territory. Against the risk of breaking the help in some way that nobody can foresee until months later when this is forgotten, it doesn't seem worth even a vague thought. I take your point about what is in the help but there's always the risk that it was either never 100% correct or that program changes have rendered it incorrect. Such things happen in any organisation. New developers, new authors etc, I'm with MergeThis. It isn't worth the risk for the saving. Sometimes the pressure to reduce the size of the help comes not so much from considerations of the server on which it will ultimately reside but on the media that will be used to deliver the application and the help, or the fact that it has to be downloaded. Ask the developers if all their folders and files are needed. When they look horrified that anyone could be so stupid as to ask, just smile back. |
||||||||||||||||||||||||||||||||||||
| 8 | 26 Apr 2006 | Mike Feimster | Hidden text in HTML.Hidden text in HTML.
In connection with topic reviews, the question was posed as to whether hidden text could be inserted into HTML other than via the comments tag. Quite simply you add style="display: none;" to a tag so that it appears something like the html below: <p style="display: none;">Hello World</p> OR <p>This is some <span style="display: none;">red</span>text.</p> The text will not be seen nor will there be an empty line or space. To reveal the text you would have to do a global find and replace changing the style to something visible that you do not use anywhere else. You would search on style="display: none;" and replace it with something like style="color: red" All the hidden text would be revealed and display red. The replace needs to be unique so that you can do a reverse find and replace. The html was suggested by Mike Feimster in connection with another use, namely getting words into a topic so that they would be found by a search even though they are not part of the topic text. Be aware that regardless of why you use this method, if style="display: none;" is in your generated help, the text will be caught by the search function. Some might argue this will confuse users doing a search as the topic will be offered up but the user will not be able to find the word. That's true so it depends on who your users are and whether this is explained to them. |

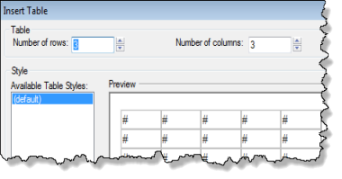
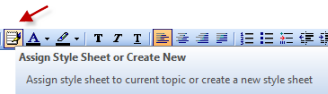
CHMs
|
No |
Date |
Credit |
Gem |
|
12 |
30 Oct 2023 |
Amber Boughen |
Create links to topics in other CHMs.Create links to topics in other CHMs.
The new UI versions do not have an option to create a link to topics in other projects. Following a post on the forum Amber Boughen did some research and came up with a method. Click here to download a project that shows how this can be done. The project has been created in RoboHelp 2019, upgrade it to your version. Click here to view/download a PDF of the instructions. |
|
11 |
22 Jan 2022 |
Various |
CHM Search not working.CHM Search not working.
Enter "Search CHM" in the RoboHelp forum and there are many pages of threads listed. First you need MJ's Diagnostics - Helpware Wiki - KB (helpwaregroup.com). That will report any missing DLLs and there is an option to re-register them. You may also need to reinstall the Microsoft Help Compiler. Unfortunately that is no long available from Microsoft but at the time of creating this Snippet, it can be downloaded from these locations, maybe more. HelpnDocsHelp and ManualThe Web Archive |
|
9 |
18 Aug 2013 |
Bill Bloomberg and Tami Settergren |
Searching in Asian Pacific (double-byte) languages / Garbage in TOC and Index.Searching in Asian Pacific (double-byte) languages / Garbage in TOC and Index.
My thanks to Bill Bloomberg for writing this up. Compiling HTML Help files for Asian Pacific (AP) languages, including Japanese, Chinese (simplified and traditional) and Thai requires that you change the Location and Locale settings on your computer to match the target language. The Control Panel’s Region and Language dialog has everything you need to change your computer’s native language. It can be deceiving, however, because you must change the settings on three of the tabs, but NOT the fourth. Figuring out which of the three is not intuitive. Here are the steps:
You are now ready to compile your Chinese CHM files. When complete, open the CHM and test the Search function to ensure that everything works properly. That’s all there is to it. I have tested this solution only on Windows 7 Enterprise and Windows 7 Home Edition, but it works just fine with both operating systems. The procedure shown above works equally well for Japanese, Thai , and Simplified Chinese. IMPORTANT - For all other languages, none of this is necessary. Keep your language and locale set to your native language (English) and your should be able to compile in all non-AP languages. **************************************** See this thread for Tami's post. See this thread for information about the TOC and Index showing garbage characters. |
|
6 |
23 Apr 2011 |
Peter Grainge |
Cannot open the file at mk:@MSITStore...Cannot open the file at mk:@MSITStore...
Trying to open a CHM and getting this message is something that seems to crop up regularly rather than frequently. Usually the answer is to run MJ's diagnostics and it will find some DLL not registered and fixing that fixes the problem. There is more information in both of these threads. Update 17 April 2019 - The link to the second thread changed and my virus checker warned me against using the site. However one person posted that the problem only occured with one CHM and, of course, an unregistered DLL will, in most cases, affect all CHMs. Digging deeper into the second link I found another cause of this message that would only affect specific CHMs. "I finally found out that the error was caused because the name of the directory containing the .chm files had non-English characters. After changing the directory's name to simple English - everything works." That is probably the first thing to check out if you have this problem. |
|
5 |
30 Mar 2010 |
David Spreadbury and Rob Chandler |
Microsoft HTML Workshop Version Number.Microsoft HTML Workshop Version Number.
From time to time we see questions about whether the current version is 1.3 or 1.4. The answer to this confusion is on Microsoft's site. The following extract explains the situation. See the full article. Important Please note that the latest version of the HTML Help technology is 1.4, as is the SDK. The latest version of the HTML Help Workshop download is 1.3. As of June 2009 there is no HTML Help Workshop 1.4. As Rob Chandler explained on the HATT forum (since closed)... All they are saying is ... don't worry that the Workshop internal version number is 1.3 while the HH Runtime is 1.4. |
Donations
If you find the information and tutorials on my site save you time figuring it out for yourself and help improve what you produce, please consider making a small donation.