Location Configuration |
The Location Configuration settings enable you to specify, for each configuration type, the Referral Code (Referral Lab or Source) and its location. If required, you can also specify path to an associated layout table file, and the path to a test code translation table.
Select Settings > Location Configuration, or press [Ctrl] + [C].
Set up the location information for each of the required program options.
Select the Configuration Type. The options available are: Exporting Orders, Importing Orders, Exporting Results, Importing Results.
Click Add. The Configure Location window is displayed.
Set up the Referral Code:
If you are configuring a location for Exporting Orders or Importing Results, select its Referral Lab Code.
If you are configuring a location for Importing Orders or Exporting Results, select its Source Code.
If you are configuring a location for Exporting Orders, enable (tick) the Automatic order export option to automatically export orders for the selected Referral Lab Code. This option is particularly useful for sites where the orders are not handled manually.
NOTE: The Referral Lab Codes, and Sources, available are set up within WinPath, via the Codes menu
Enter the Path and Filename for the file import or export.
When importing orders, a request may already have been booked in. Enable (tick) the Append Test(s) to Existing Request option of you want any new tests to be appended to the existing order.
If you wish to use a different Layout File to format the layout table, enter a letter or number to specify its filename. To use the default layout table (as defined by CliniSys during the installation of the software), leave this field blank (empty).
WARNING!: The R1 switch is added at the end after the TLCs (TL) and no other field should be positioned after either of these fields - the reason for this is that there is a variable number of TLCs and / or TFCs to be included in the output file; so, it is not possible to ‘fix’ the position for another data item after them.
NOTE: For more information about layout tables, consult CliniSys.
If a test code translation file is required, enter its filename in the Test and Histology Translation Files field.
Click OK to save the changes and close the window.
The new entry will be displayed in the Locations list.
Select the location to be edited from the Locations list.
Click Edit. The Configure Location window is displayed.
Make the required changes.
Click OK to save your changes. Otherwise, click Cancel.
Select the location to be deleted from the Locations list.
Click Remove. A confirmation box is displayed.
Click Yes to confirm the deletion of the selected location. Otherwise, click No.
The source codes listed in the file REFERTO.TXT are displayed, from which a selection can be made. The suffix letter against the selection determines which layout file to use. For example: if <A> is found in the column named ‘X’, the layout file will be named \LABDATA\REFOUTA.TXT. If no suffix is used, then the layout file will be named \LABDATA\REFOUT.TXT.
Select the required option from the Configuration Type drop down list. The different options available are: Exporting Orders, Importing Orders, Exporting Results, and Importing Results.
Select the source from the Locations list.
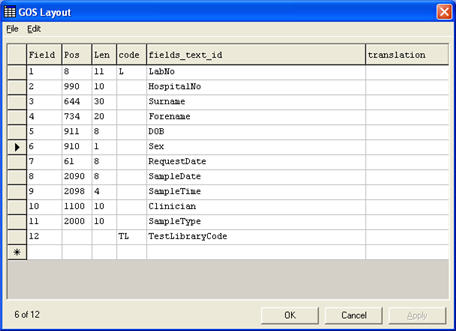
Click Layout. The Layout window displays the layout file for the order, as defined in its location configuration:
|
Column Name |
Description |
||||||||||||||||||||||||||||||||||||||||
|
Field |
The field number, starting from 1. |
||||||||||||||||||||||||||||||||||||||||
|
Pos |
The position of the field in the order. This field is completed automatically when you enter the fields_text_id. |
||||||||||||||||||||||||||||||||||||||||
|
Len |
The length of the field. This field is completed automatically when you enter the fields_text_id. |
||||||||||||||||||||||||||||||||||||||||
|
code |
Any field code required, such as:
|
||||||||||||||||||||||||||||||||||||||||
|
fields_text_id |
The field description. To display a pop-up that lists the common field descriptions used (together with their corresponding Pos and Len values), hover your mouse pointer over the column header. Enter a field description. The Pos and Len fields are completed automatically. |
||||||||||||||||||||||||||||||||||||||||
|
translation |
The name of the Translation table used for data that needs to be translated between systems |
When setting up a File Layout, insert or delete rows, as described below, such that your layout conforms to the following guidelines:
Set up fields for identifiers (such as Laboratory Number and Hospital Number),.patient demographics, and sample information.
Then set up a T or TL field (for Orders), or an R or R1 field (for Results).
Finally, set up any Switch fields required.
For example:
NOTE: When exporting orders from Specialist Pathology, export the Clinician code and Source code. These are mapped to the Originating Clinician and Originating Source field when the order is imported to the referral system.
To edit the File layout:
Click in the appropriate field, so that the mouse pointer becomes an editing cursor, and then amend the entry as required.
To insert a new row:
Select the row that will be above the inserted row.
Select Edit > Insert Row , or press [Ctrl] + [A}
To delete a row:
Select the row that you wish to delete.
Select Edit > Delete Row, or press [Ctrl] + [D]
To save your changes:
Click OK to save the changes and close the window. Otherwise, click Cancel.
To edit the test translation table:
Select the required source code.
Click Translation. The Layout Translation Table Selection window is displayed.
Select the field you wish to edit, click Edit, and then enter the required changes.
Click OK to save and close the window. Otherwise, click Cancel.
To edit the tests:
The source codes listed in the file REFFROM.TXT are displayed from which a selection can be made.
The name of the translation table associated with a particular source code is derived from the Laboratory code in the fourth column. For example: If the Laboratory code is “HIS”, then the translation table is named “HIS.ICT”.
To set up the Test Translation information for each of the required program options:
Select the required option from the Configuration Type drop-down list. The options available are: Exporting Orders, Importing Orders, Exporting Results and Importing Results.
Select the source from the Locations list.
Click Test. The Test Translation table is displayed:
|
Column Name |
Description |
|
Local code |
The local test format code. |
|
referring lab code |
The test code for the referring laboratory. |
|
Library code |
The local test library code. |
To edit the test:
Click in the appropriate field, so that the mouse pointer becomes an editing cursor, and then amend the entry as required.
To insert a new row:
Select the row that will be above the inserted row.
Select Edit > Insert Row , or press [Ctrl] + [A}
To delete a row:
Select the row that you wish to delete.
Select Edit > Delete Row, or press [Ctrl] + [D]
To save your changes:
Click OK to save the changes and close the window. Otherwise, click Cancel.
Select the required option from the Configuration Type drop down list. The different options available are: Exporting Orders, Importing Orders, Exporting Results, and Importing Results.
Select the source from the Locations list.
Click Histology. The Translation table is displayed:
|
Column Name |
Description |
|
Local code |
The local test format code. |
|
Remote lab code |
The test code for the referring laboratory. |
|
Type (S/B/P) |
Displays whether this is a Specimen Block or slide Procedure. |
To edit the test:
Click in the appropriate field, so that the mouse pointer becomes an editing cursor, and then amend the entry as required.
To insert a new row:
Select the row that will be above the inserted row.
Select Edit > Insert Row, or press [Ctrl] + [A}
To delete a row:
Select the row that you wish to delete,
Select Edit > Delete Row, or press [Ctrl] + [D]
To save your changes:
Click OK to save the changes and close the window. Otherwise, click Cancel.